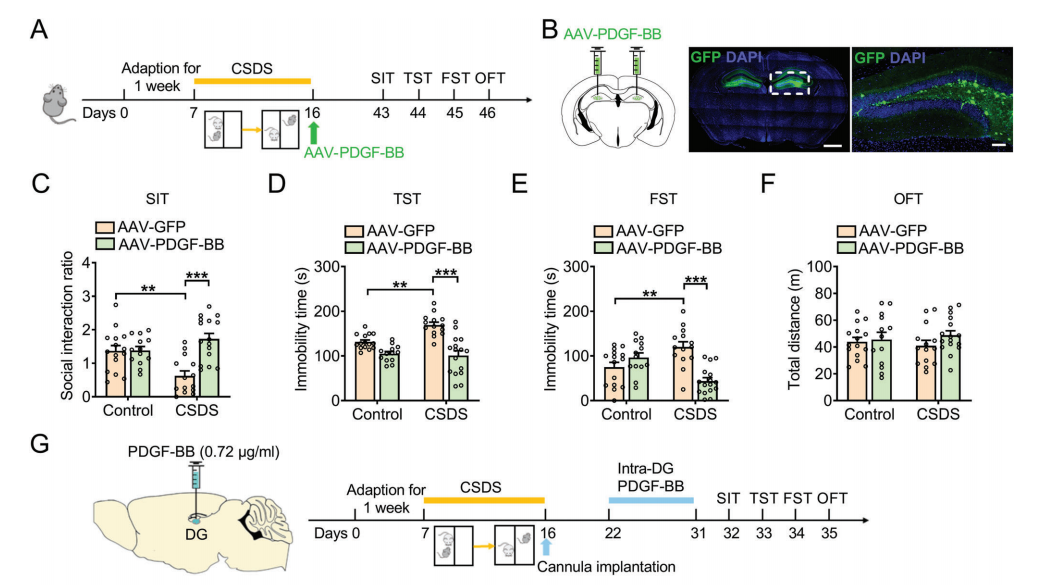
Gulp脚本 如何下载、配置,这里我给出一个我跟着来的教程Hexo使用Gulp压缩静态资源 ,2操作是必须的,3操作我使用了,4-5我并没有参考
这里着重说明一下,关于脚本执行顺序,以及精简代码
脚本执行顺序 1 2 3 4 5 6 7 8 9 10 11 12 // 执行顺序: 清除public目录 -> 产生原始博客内容 -> 执行压缩混淆 -> 部署到服务器 gulp.task( "default", gulp.series( "clean", "generate", "compressHtml", "compressCss", "compressJs", gulp.parallel("deploy") ) );
先是clean,清除已经创建的public文件夹
之后是生成页面
接下来分别是压缩HTML文件、CSS文件、JS文件
最后是将本地部署到GitHubPage仓库当中去
精简代码 原本我们需要hexo clean -> hexo g -> hexo d三个命令才能完成部署上去这个任务,不过在gulp中,我们可以自定义task,也就是上面给出的代码,不仅能自定义顺序,还能自定义这个任务触发的命令,比如这里我使用默认的default设置,当设置为default的时候,我们只需要在终端中,输入gulp,就可以直接开始上面提到的脚本执行顺序,这样可以使得一个命令,集成多步操作,稍微“偷懒”一下
代码提供 先在hexo目录下创建gulpfile.js文件
如果本来就有这个文件,直接打开,把里面的代码替换成下面我提供的就行了
1 2 3 4 5 6 7 8 9 10 11 12 13 14 15 16 17 18 19 20 21 22 23 24 25 26 27 28 29 30 31 32 33 34 35 36 37 38 39 40 41 42 43 44 45 46 47 48 49 50 51 52 53 54 55 56 57 58 59 60 61 62 63 64 65 66 67 68 69 70 71 72 73 74 75 76 77 78 79 80 81 82 83 84 85 86 87 88 89 90 91 92 93 94 95 96 97 98 99 100 101 102 103 104 105 106 107 108 109 110 111 112 113 114 115 116 117 118 119 120 121 122 123 124 125 126 127 128 129 130 131 132 133 134 135 136 137 138 139 140 141 var gulp = require ("gulp" );var debug = require ("gulp-debug" );var cleancss = require ("gulp-clean-css" ); var uglify = require ("gulp-uglify" ); var htmlmin = require ("gulp-htmlmin" ); var htmlclean = require ("gulp-htmlclean" ); var changed = require ("gulp-changed" ); var gulpif = require ("gulp-if" ); var plumber = require ("gulp-plumber" ); var isScriptAll = true ; var isDebug = true ; var gulpBabel = require ("gulp-babel" );var es2015Preset = require ("babel-preset-es2015" );var del = require ("del" );var Hexo = require ("hexo" );var hexo = new Hexo (process.cwd (), {}); gulp.task ("clean" , function ( return del (["public/**/*" ]); }); gulp.task ("generate" , function ( return hexo.init ().then (function ( return hexo .call ("generate" , { watch : false }) .then (function ( return hexo.exit (); }) .catch (function (err ) { return hexo.exit (err); }); }); }); gulp.task ("server" , function ( return hexo .init () .then (function ( return hexo.call ("server" , {}); }) .catch (function (err ) { console .log (err); }); }); gulp.task ("deploy" , function ( return hexo.init ().then (function ( return hexo .call ("deploy" , { watch : false }) .then (function ( return hexo.exit (); }) .catch (function (err ) { return hexo.exit (err); }); }); }); gulp.task ("compressJs" , function ( return gulp .src (["./public/js/*.js" , "!./public/js/utils.js" ]) .pipe (gulpif (!isScriptAll, changed ("./public" ))) .pipe (gulpif (isDebug, debug ({ title : "Compress JS:" }))) .pipe (plumber ()) .pipe ( gulpBabel ({ presets : [es2015Preset] }) ) .pipe (uglify ()) .pipe (gulp.dest ("./public" )); }); gulp.task ("compressCss" , function ( var option = { rebase : false , compatibility : "ie7" }; return gulp .src (["./public/**/*.css" , "!./public/**/*.min.css" ]) .pipe (gulpif (!isScriptAll, changed ("./public" ))) .pipe (gulpif (isDebug, debug ({ title : "Compress CSS:" }))) .pipe (plumber ()) .pipe (cleancss (option)) .pipe (gulp.dest ("./public" )); }); gulp.task ("compressHtml" , function ( var cleanOptions = { protect : /<\!--%fooTemplate\b.*?%-->/g , unprotect : /<script [^>]*\btype="text\/x-handlebars-template"[\s\S]+?<\/script>/gi }; var minOption = { collapseWhitespace : true , collapseBooleanAttributes : true , removeEmptyAttributes : true , removeScriptTypeAttributes : true , removeStyleLinkTypeAttributes : true , removeComments : true , minifyJS : true , minifyCSS : true , minifyURLs : true }; return gulp .src ("./public/**/*.html" ) .pipe (gulpif (isDebug, debug ({ title : "Compress HTML:" }))) .pipe (plumber ()) .pipe (htmlclean (cleanOptions)) .pipe (htmlmin (minOption)) .pipe (gulp.dest ("./public" )); }); gulp.task ( "default" , gulp.series ( "clean" , "generate" , "compressHtml" , "compressCss" , "compressJs" , gulp.parallel ("deploy" ) ) );
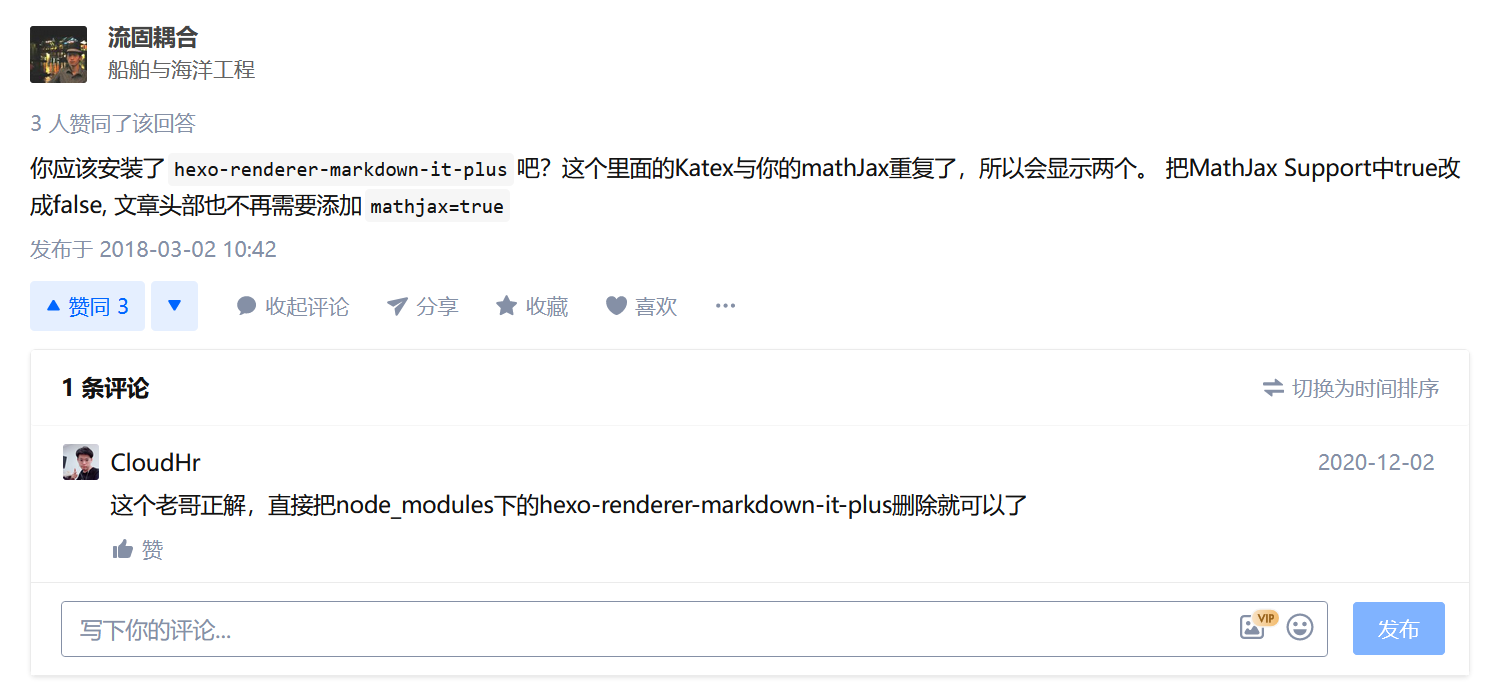
MathJax数学公式重复 关于这个问题,我找了几个教程,但都不怎么对,这里我先提供一个,相对完整的教程这次彻底解决在Hexo中渲染MathJax数学公式出现的问题!!!
在删除这个文件之后,渲染问题才能彻底解决,这个文件可能后面没有-plus,不过没有影响,不带-plus也可以删除


 支付宝
支付宝