安卓通信录app简单demo制作
1.问题概述
设计一个通信录app
2.课程设计基本要求
(1)添加联系人
(2)查看所有联系人
(3)查看联系人的详情
(4)对联系人信息进行编辑修改、删除
(5)拨打联系人电话、发送短信
3.通信录设计需求分析
3.1可行性研究
在我们生活中,有如下四个通讯需求:
1.基础通话与通话记录
2.查看、管理联系人
3.收发短信
4.基于数据流量的社交与通讯工具
因此一个安卓通讯录app,对于手机来说是一项较为重要的功能。
3.1.1 技术可行性
随着计算机技术的发展,网络环境不断提升,各种通信工具技术也得到提高,同时,计算机软件开发越来越人性化,门槛更低,使用当前主流的JAVA语言完全可以开发出功能完善、简单易用的互联网程序,Android具备多种存储方式,对于通信录这样的轻量级数据,可以使用sharepreference或者sqlite和文件存储,技术上是可行的。
3.1.2 经济可行性
现在,计算机使用已经相当普遍,网络费用不断降低,开发通信录可以大大的方便管理联系人,同时开发此应用的周期短,Android也是开源免费,因此,此系统在经济方面是可行的。
3.1.3 操作可行性
目前是信息高速发展的时代,几乎人人都配备着手机,并且都会简单的使用手机,通信录无需复杂的操作,会用手机的人都能轻轻松松使用,因此操作上是可行的。
3.2 系统功能需求分析
通信录的主要功能是对联系人进行添加。浏览,修改和删除,同时具备快捷拨打电话。发送短信等功能。
3.2.1 系统功能模块概述
现在对此系统的功能模块进行概述。
1、功能主页模块:该模块用来为用户提供功能入口,用户可以选择添加联系人或者查看所有联系人
2、添加联系人模块:该模块下用户可以进行添加联系人。
3、查看所有联系人模块:该模块可以查看所有已添加的联系人信息。
4、联系人详情模块:该模块可以对联系人进行修改、删除或快捷拨打电话、发送信息
4.通信录概要分析
4.1通信录开发环境
本应用的开发语言是Java,所使用的IDE开发工具是Android Studio
4.2项目所需技术技术
本项目使用当前比较流行的MVC架构设计技术,利用Activity配合Fragment进行界面的切换显示,利用MMKV做数据存储读取
4.2.1 MMKV介绍
MMKV 是由腾讯开发的基于 mmap 内存映射的 key-value 组件,底层序列化/反序列化使用 protobuf 实现,性能高,稳定性强,便于轻量级数据的存储。
4.2.2 Activity介绍
Activity是Android组件中最基本也是最为常见用的四大组件之一,Activity是一个应用程序组件,提供一个界面,用户可以用来交互为了完成某项任务。Activity中所有操作都与用户密切相关,是一个负责与用户交互的组件,可以通过setContentView(View)来显示指定控件。在一个android应用中,一个Activity通常就是一个单独的屏幕,它上面可以显示一些控件也可以监听并处理用户的事件做出响应。Activity之间通过Intent进行通信。
4.2.3 Fragment介绍
Fragment是Android3.0后引入的一个新的API,他出现的初衷是为了适应大屏幕的平板电脑,当前普通手机开发也会加入这个Fragment,可以把他看成一个小型的Activity,又称Activity片段,使用Fragment可以把屏幕划分成几块,然后进行分组,进行一个模块化的管理,从而可以更加方便的在 运行过程中动态地更新Activity的用户界面。Fragment并不能单独使用,他需要嵌套在Activity 中使用,尽管他拥有自己的生命周期,但是还是会受到宿主Activity的生命周期的影响,比如Activity 被destory销毁了,他也会跟着销毁。
4.3通信录应用的总体结构设计
通信录应用主要包括四大功能模块,主页菜单、添加联系人、浏览联系人、联系人详情等功能模块。总体模块如下所示。
待补充
5.通信录应用的详细设计
5.1功能主页设计
应用提供功能菜单,包括两个按钮菜单项,用来跳转到相应界面
5.1.1界面布局
包括两个按钮。用普通的线性布局包裹。1
2
3
4
5
6
7
8
9
10
11
12
13
14
15
16
17
18
19
20<?xml version="1.0" encoding="utf-8"?>
<LinearLayout xmlns:android="http://schemas.android.com/apk/res/android"
android:layout_width="match_parent"
android:layout_height="match_parent"
android:orientation="vertical"
android:padding="16dp">
<Button
android:textSize="18sp"
android:text="添加联系人"
android:id="@+id/addUser"
android:layout_width="match_parent"
android:layout_height="wrap_content" />
<Button
android:textSize="18sp"
android:text="查看所有联系人"
android:id="@+id/allUser"
android:layout_width="match_parent"
android:layout_height="wrap_content" />
</LinearLayout>
点击添加按钮跳转到添加联系人的fragment:1
2
3
4
5
6view.findViewById(R.id.addUser).setOnClickListener(new View.OnClickListener() {
public void onClick(View v) {
((MainActivity)getActivity()).jumpToAddPage();
}
});
实际上的跳转逻辑在Activity里:1
2
3
4
5
6
7
8
9
10
11
12
13
14
15
16
17
18public void jumpToAddPage() {
AddUserFragment addUserFragment = (AddUserFragment) getSupportFragmentManager().findFragmentByTag("add");
if (addUserFragment == null) {
addUserFragment = new AddUserFragment();
}
MainFragment fragment = (MainFragment) getSupportFragmentManager().findFragmentByTag("main");
if (fragment != null) {
getSupportFragmentManager().beginTransaction().hide(fragment)
.add(R.id.layout_container, addUserFragment)
.addToBackStack(null)
.commitAllowingStateLoss();
} else {
getSupportFragmentManager().beginTransaction()
.replace(R.id.layout_container, addUserFragment)
.addToBackStack(null)
.commitAllowingStateLoss();
}
}
点击查看所有联系人按钮跳转到所有联系人列表界面:1
2
3
4
5
6view.findViewById(R.id.allUser).setOnClickListener(new View.OnClickListener() {
public void onClick(View v) {
((MainActivity)getActivity()).jumpToAllPage();
}
});
实际上的跳转逻辑在Activity里:1
2
3
4
5
6
7
8
9
10
11
12
13
14
15
16
17
18public void jumpToAllPage() {
AllUserFragment allUserFragment = (AllUserFragment) getSupportFragmentManager().findFragmentByTag("all");
if (allUserFragment == null) {
allUserFragment = new AllUserFragment();
}
MainFragment fragment = (MainFragment) getSupportFragmentManager().findFragmentByTag("main");
if (fragment != null) {
getSupportFragmentManager().beginTransaction().hide(fragment)
.add(R.id.layout_container, allUserFragment)
.addToBackStack(null)
.commitAllowingStateLoss();
} else {
getSupportFragmentManager().beginTransaction()
.replace(R.id.layout_container, allUserFragment)
.addToBackStack(null)
.commitAllowingStateLoss();
}
}
5.2添加联系人设计
点击添加联系人后跳转到添加联系人界面,布局如下:1
2
3
4
5
6
7
8
9
10
11
12
13
14
15
16
17
18
19
20
21
22
23
24
25
26
27
28
29
30
31
32
33
34
35
36
37
38
39
40
41
42
43
44
45
46
47
48
49
50
51
52
53
54
55
56
57
58<?xml version="1.0" encoding="utf-8"?>
<LinearLayout xmlns:android="http://schemas.android.com/apk/res/android"
android:layout_width="match_parent"
android:layout_height="match_parent"
android:orientation="vertical"
android:padding="16dp">
<LinearLayout
android:orientation="horizontal"
android:layout_width="match_parent"
android:layout_height="wrap_content">
<TextView
android:text="姓名:"
android:layout_width="wrap_content"
android:layout_height="wrap_content" />
<EditText
android:maxLength="7"
android:id="@+id/et_user"
android:layout_width="match_parent"
android:layout_height="wrap_content" />
</LinearLayout>
<LinearLayout
android:orientation="horizontal"
android:layout_width="match_parent"
android:layout_height="wrap_content">
<TextView
android:text="电话:"
android:layout_width="wrap_content"
android:layout_height="wrap_content" />
<EditText
android:maxLength="11"
android:id="@+id/et_phone"
android:layout_width="match_parent"
android:layout_height="wrap_content" />
</LinearLayout>
<Button
android:textSize="18sp"
android:text="添加电话"
android:id="@+id/add"
android:layout_width="match_parent"
android:layout_height="wrap_content" />
<Button
android:textSize="18sp"
android:text="返回"
android:id="@+id/back"
android:layout_width="match_parent"
android:layout_height="wrap_content" />
</LinearLayout>
这个界面包括两个TextView和两个EditTextView还有两个Button。TextView起提示作用,EditText接收用户的输入,Button进行数据的保存和返回。点击保存的代码:1
2
3
4
5
6
7
8
9
10
11
12
13
14
15
16view.findViewById(R.id.add).setOnClickListener(new View.OnClickListener() {
public void onClick(View v) {
String name = etName.getText().toString();
String phone = etPhone.getText().toString();
if (!TextUtils.isEmpty(name) && !TextUtils.isEmpty(phone)) {
CommonManager.getInstance().addUserInfo(new UserInfo(name, phone));
etName.setText("");
etPhone.setText("");
Toast.makeText(getActivity(),"添加成功!",Toast.LENGTH_LONG).show();
}else {
Toast.makeText(getActivity(),"姓名或电话不能为空!",Toast.LENGTH_LONG).show();
}
}
});
5.3查看所有联系人设计
布局如下:1
2
3
4
5
6
7
8
9
10
11
12
13
14
15
16
17
18
19
20
21
22
23
24
25
26
27
28
29
30
31
32
33
34
35
36
37
38
39
40
41
42
43
44
45
46
47
48
49
50
51
52<?xml version="1.0" encoding="utf-8"?>
<LinearLayout xmlns:android="http://schemas.android.com/apk/res/android"
xmlns:app="http://schemas.android.com/apk/res-auto"
xmlns:tools="http://schemas.android.com/tools"
android:layout_width="match_parent"
android:layout_height="match_parent"
android:orientation="vertical"
android:padding="16dp">
<Button
android:id="@+id/back"
android:layout_width="match_parent"
android:layout_height="wrap_content"
android:text="回到首页"
android:textSize="18sp" />
<LinearLayout
android:layout_width="match_parent"
android:layout_height="wrap_content"
android:layout_marginTop="8dp"
android:orientation="horizontal">
<TextView
android:id="@+id/name"
android:layout_width="match_parent"
android:layout_height="wrap_content"
android:layout_weight="1"
android:text="姓名"
android:textColor="@color/black"
android:textSize="18sp" />
<TextView
android:id="@+id/phone"
android:layout_width="match_parent"
android:layout_height="wrap_content"
android:layout_weight="1"
android:text="号码"
android:textColor="@color/black"
android:textSize="18sp" />
</LinearLayout>
<androidx.recyclerview.widget.RecyclerView
android:layout_marginTop="8dp"
android:id="@+id/rv"
android:layout_width="match_parent"
android:layout_height="wrap_content"
/>
</LinearLayout>
其中最主要是用了RecyclerView进行用户信息的列表显示,RecycerView的适配器如下:1
2
3
4
5
6
7
8
9
10
11
12
13
14
15
16
17
18
19
20
21
22
23
24
25
26
27
28
29
30
31
32
33
34
35
36
37
38
39
40
41
42
43
44
45
46
47
48
49
50
51
52
53
54
55
56
57
58
59
60public class RvAdapter extends RecyclerView.Adapter<RvAdapter.ItemHolder> {
private Context mContext;
private List<UserInfo> mList;
private ItemClickListener mItemClickListener;
public RvAdapter(Context context, List<UserInfo> list) {
mContext = context;
mList = list;
}
public interface ItemClickListener {
void onItemClick(UserInfo userInfo);
}
public void setOnItemClickListener(ItemClickListener itemClickListener) {
mItemClickListener = itemClickListener;
}
public ItemHolder onCreateViewHolder( ViewGroup parent, int viewType) {
View itemView = LayoutInflater.from(mContext).inflate(R.layout.rv_item, parent, false);
return new ItemHolder(itemView);
}
public void onBindViewHolder( ItemHolder holder, int position) {
UserInfo data = mList.get(position);
holder.name.setText(data.name);
holder.phone.setText(data.phone);
holder.itemView.setOnClickListener(new View.OnClickListener() {
public void onClick(View v) {
if (mItemClickListener!=null){
mItemClickListener.onItemClick(data);
}
}
});
}
public int getItemCount() {
return mList.size();
}
class ItemHolder extends RecyclerView.ViewHolder {
private TextView name;
private TextView phone;
public ItemHolder( View itemView) {
super(itemView);
name = itemView.findViewById(R.id.name);
phone = itemView.findViewById(R.id.phone);
}
}
}
点击某一项,跳转到联系人详情页:1
2
3
4
5
6
7
8
9
10
11
12
13
14
15
16
17
18
19
20
21
22
23
24
25
26
27
28 rvAdapter.setOnItemClickListener(new RvAdapter.ItemClickListener() {
public void onItemClick(UserInfo userInfo) {
((MainActivity)getActivity()).jumpToDetailPage(userInfo);
}
});
真正跳转逻辑在activity里:
public void jumpToDetailPage(UserInfo userInfo) {
UserDetailFragment userDetailFragment = (UserDetailFragment) getSupportFragmentManager().findFragmentByTag("detail");
if (userDetailFragment == null) {
userDetailFragment = new UserDetailFragment();
Bundle bundle = new Bundle();
bundle.putParcelable("userinfo",userInfo);
userDetailFragment.setArguments(bundle);
}
AllUserFragment fragment = (AllUserFragment) getSupportFragmentManager().findFragmentByTag("all");
if (fragment != null) {
getSupportFragmentManager().beginTransaction().hide(fragment)
.add(R.id.layout_container, userDetailFragment)
.addToBackStack(null)
.commitAllowingStateLoss();
} else {
getSupportFragmentManager().beginTransaction()
.replace(R.id.layout_container, userDetailFragment)
.addToBackStack(null)
.commitAllowingStateLoss();
}
}
5.4联系人详情页设计
联系人详情页不仅要显示联系人的姓名和名称,还要能对联系人的信息进行修改、删除,也可以拨打电话和发送短信,布局如下:1
2
3
4
5
6
7
8
9
10
11
12
13
14
15
16
17
18
19
20
21
22
23
24
25
26
27
28
29
30
31
32
33
34
35
36
37
38
39
40
41
42
43
44
45
46
47
48
49
50
51
52
53
54
55
56
57
58
59
60
61
62
63
64
65
66
67
68
69
70
71
72
73
74
75
76
77
78
79
80
81
82
83
84
85
86
87
88
89
90
91
92
93
94
95
96
97
98
99
100
101
102
103
104
105
106
107
108
109<?xml version="1.0" encoding="utf-8"?>
<LinearLayout xmlns:android="http://schemas.android.com/apk/res/android"
android:layout_width="match_parent"
android:layout_height="match_parent"
android:orientation="vertical"
android:padding="16dp">
<LinearLayout
android:orientation="horizontal"
android:layout_width="match_parent"
android:layout_height="wrap_content">
<TextView
android:text="姓名:"
android:layout_width="wrap_content"
android:layout_height="wrap_content" />
<EditText
android:maxLength="7"
android:id="@+id/et_user"
android:layout_width="match_parent"
android:layout_height="wrap_content" />
</LinearLayout>
<LinearLayout
android:orientation="horizontal"
android:layout_width="match_parent"
android:layout_height="wrap_content">
<TextView
android:text="电话:"
android:layout_width="wrap_content"
android:layout_height="wrap_content" />
<EditText
android:maxLength="11"
android:id="@+id/et_phone"
android:layout_width="match_parent"
android:layout_height="wrap_content" />
</LinearLayout>
<LinearLayout
android:layout_marginTop="8dp"
android:orientation="horizontal"
android:layout_width="match_parent"
android:layout_height="wrap_content">
<Button
android:layout_weight="1"
android:textSize="18sp"
android:text="删除"
android:id="@+id/delete"
android:layout_width="wrap_content"
android:layout_height="wrap_content" />
<Button
android:layout_marginStart="16dp"
android:layout_weight="1"
android:textSize="18sp"
android:text="修改"
android:id="@+id/modify"
android:layout_width="wrap_content"
android:layout_height="wrap_content" />
</LinearLayout>
<EditText
android:padding="8dp"
android:hint="请输入信息内容"
android:gravity="left"
android:layout_marginTop="8dp"
android:inputType="textMultiLine"
android:layout_weight="1"
android:id="@+id/et_msg"
android:layout_width="match_parent"
android:layout_height="0dp" />
<LinearLayout
android:layout_marginTop="8dp"
android:orientation="horizontal"
android:layout_width="match_parent"
android:layout_height="wrap_content">
<Button
android:layout_weight="1"
android:textSize="18sp"
android:text="拨打电话"
android:id="@+id/call"
android:layout_width="wrap_content"
android:layout_height="wrap_content" />
<Button
android:layout_marginStart="16dp"
android:layout_weight="1"
android:textSize="18sp"
android:text="发送短信"
android:id="@+id/send"
android:layout_width="wrap_content"
android:layout_height="wrap_content" />
</LinearLayout>
<Button
android:layout_marginTop="8dp"
android:textSize="18sp"
android:text="返回"
android:id="@+id/back"
android:layout_width="match_parent"
android:layout_height="wrap_content" />
</LinearLayout>
有三个EditText,前两个是显示和编辑联系人的名字和号码,第三个是用来编辑发送的信息内容,删除按钮可以对信息进行删除,修改按钮对信息进行修改,拨打电话会立刻调动手机进行拨号,发送短信也会直接读取内容发送到相应号码上。删除代码如下:1
2
3
4
5
6
7
8
9
10
11
12
13
14
15
16
17
18
19
20
21
22
23
24
25
26
27
28
29 case R.id.delete:
Toast.makeText(getActivity(), "删除成功!", Toast.LENGTH_LONG).show();
CommonManager.getInstance().removeUserInfo(userInfo);
getActivity().getSupportFragmentManager().popBackStack();
break;
会显示一个删除成功的提示,并且对全局里的数据进行删除,然后返回上一页。
修改代码如下:
case R.id.modify:
String name = etName.getText().toString();
String phone = etPhone.getText().toString();
if (!TextUtils.isEmpty(name) && !TextUtils.isEmpty(phone)) {
userInfo.name = name;
userInfo.phone = phone;
Toast.makeText(getActivity(), "修改成功!", Toast.LENGTH_LONG).show();
} else {
Toast.makeText(getActivity(), "姓名或电话不能为空!", Toast.LENGTH_LONG).show();
}
break;
把存储的数据替换为当前修改的信息,如果为空则提示并且不做修改。
拨打电话如下:
private void callPhone() {
String phoneNumber = etPhone.getText().toString();
if (TextUtils.isEmpty(phoneNumber)) {
Toast.makeText(getActivity(), "电话为空无法拨打电话!", Toast.LENGTH_LONG).show();
} else {
Intent intent = new Intent(Intent.ACTION_CALL, Uri.parse("tel:" + phoneNumber));
startActivity(intent);
}
}
调用系统的action进行拨号,拨号前需要申请系统权限。
发送信息如下:1
2
3
4
5
6
7
8
9
10
11
12
13
14
15
16private void sendSMS() {
String content = etMsg.getText().toString().trim();
String phone = etPhone.getText().toString().trim();
if (!TextUtils.isEmpty(content) && !TextUtils.isEmpty(phone)) {
SmsManager manager = SmsManager.getDefault();
ArrayList<String> strings = manager.divideMessage(content);
for (int i = 0; i < strings.size(); i++) {
manager.sendTextMessage(phone, null, content, null, null);
}
Toast.makeText(getContext(), "发送成功", Toast.LENGTH_SHORT).show();
} else {
Toast.makeText(getContext(), "手机号或内容不能为空", Toast.LENGTH_SHORT).show();
return;
}
}
调用系统的信息管理器发送信息,信息内容为编辑框里编辑的内容,如果内容为空则提示并且不发送
5.5数据的保存和恢复设计
在每次启动应用的时候会读取存储的数据,保存为全局数据:1
2
3
4
5
6
7
8
9
10
11
12
13
14String jsonStr = MMKV.defaultMMKV().decodeString("userinfolist");
if (!TextUtils.isEmpty(jsonStr)) {
List<UserInfo> userInfoList = CommonManager.getInstance().getUserInfoList();
userInfoList.clear();
try {
Gson gson = new Gson();
JsonArray array = JsonParser.parseString(jsonStr).getAsJsonArray();
for (JsonElement jsonElement : array) {
userInfoList.add(gson.fromJson(jsonElement, UserInfo.class));
}
} catch (Exception e) {
e.printStackTrace();
}
}
用MMKV读取存储的数据,然后用Gson进行解析,放到数据集合中。
在关闭应用的时候进行数据保存:1
2
3
4
5
6
7
protected void onDestroy() {
super.onDestroy();
Gson gson = new Gson();
String strJson = gson.toJson(CommonManager.getInstance().getUserInfoList());
MMKV.defaultMMKV().encode("userinfolist", strJson);
}
把数据集合转换json,用MMKV进行保存
6.系统的调试分析
6.1运行截图
功能主页: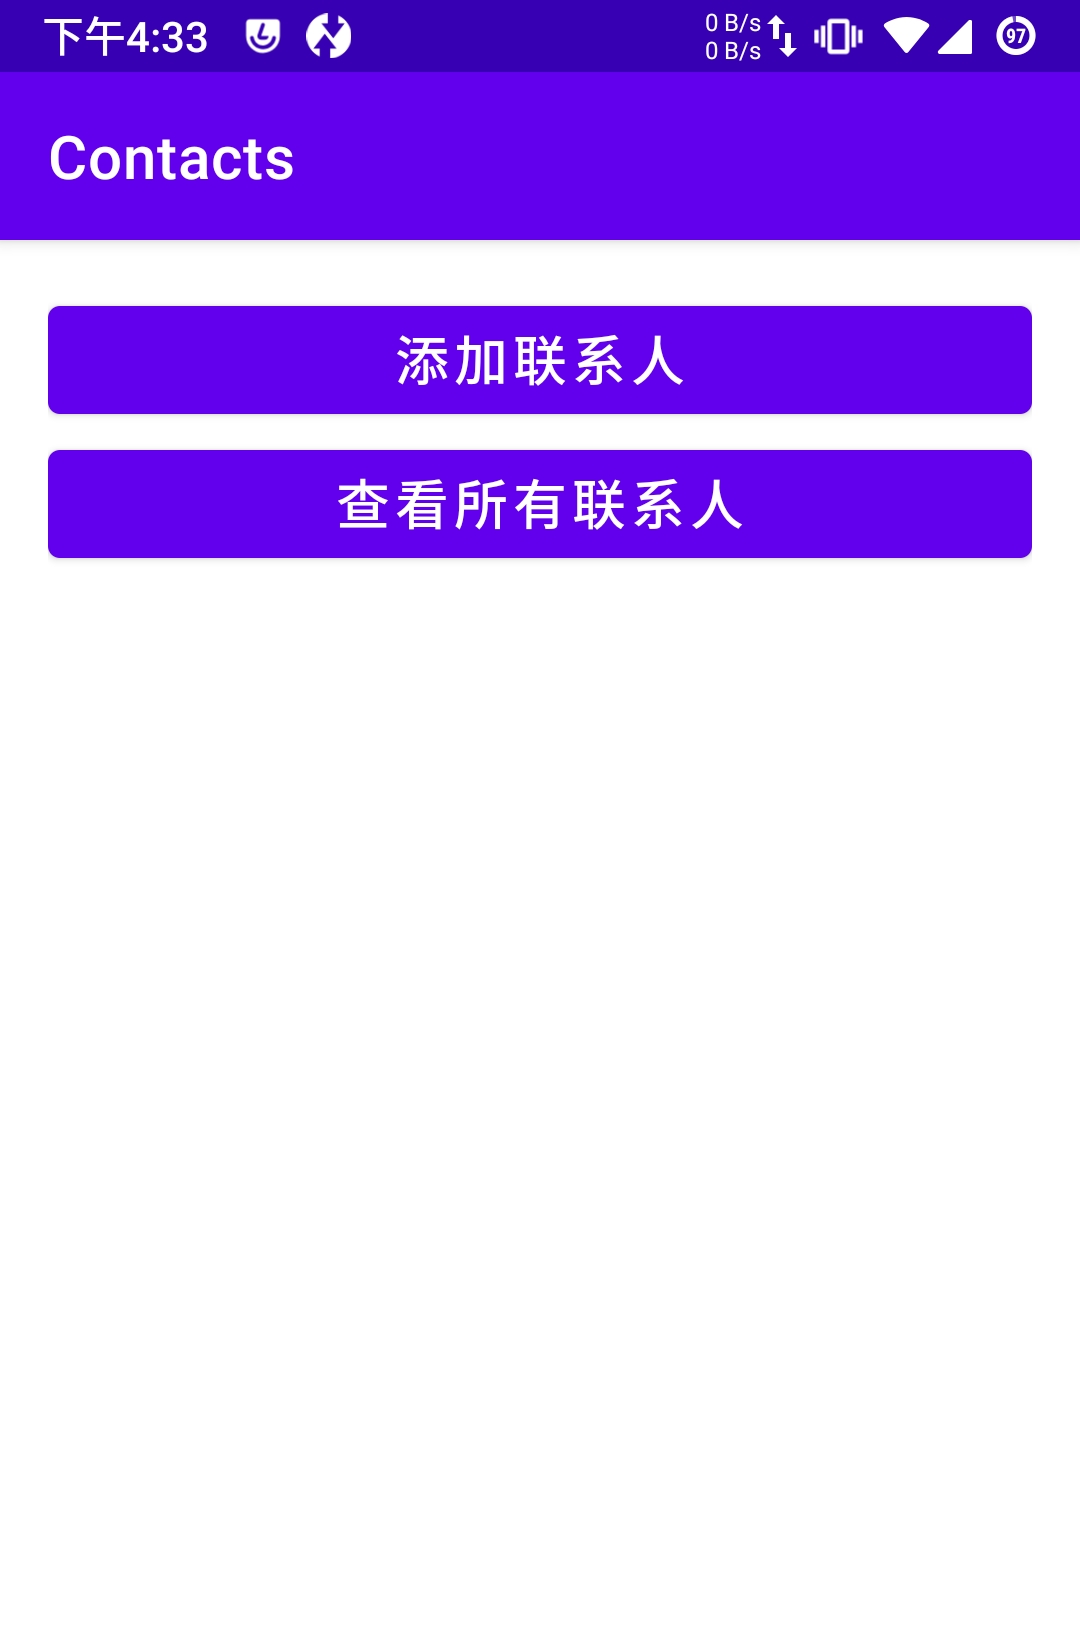
添加用户: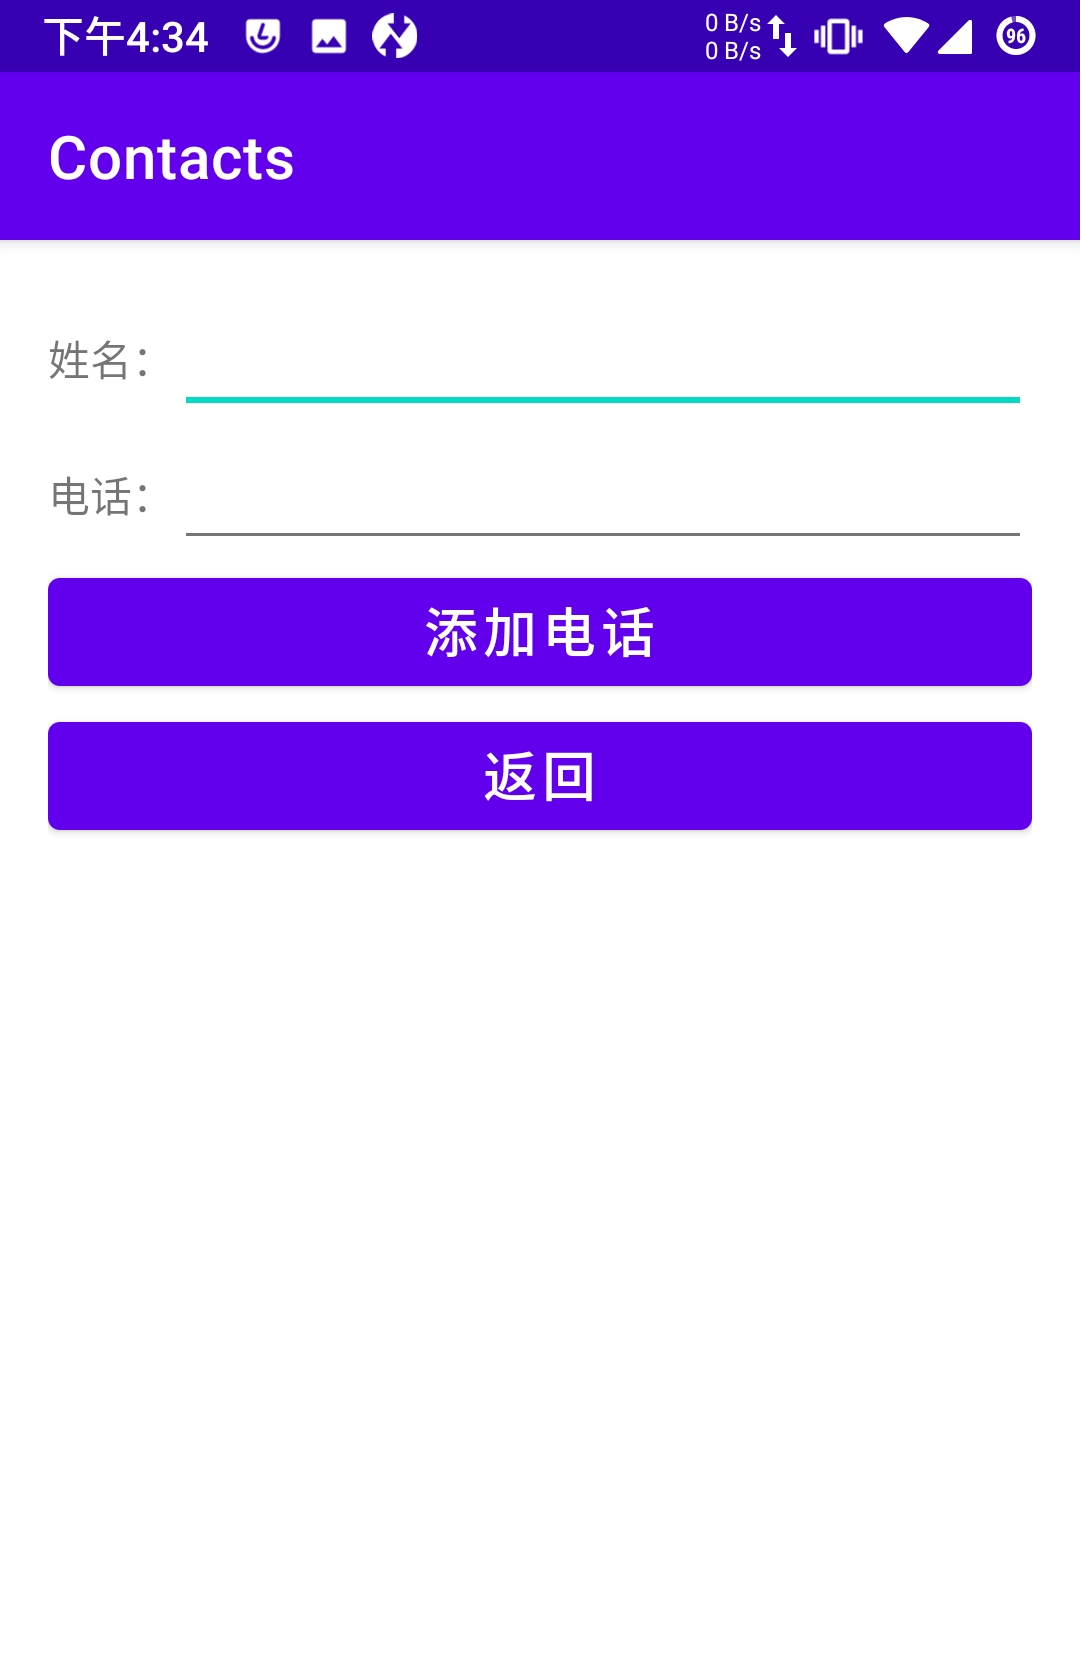
所有联系人:
联系人详情页:
7.总结
经过这段开发,Android移动应用开发工作基本完成,相应的功能也基本实现,但系统的功能完善性还不是很好,由于本次系统开发受到我的编码能力的限制,因此本系统还存在很多方面的不足。
通过开发这个系统,我掌握了基本的过程,学习了知识的同时还掌握了开发系统的基本的相关操作,同时,对于java的操作也更加熟练了。
 支付宝
支付宝- 微信